Tampilkan postingan dengan label tips and trik linux. Tampilkan semua postingan

Minggu, 09 September 2012

Belajar Linux - Daftar Lengkap DNS Terbaik

Saat melakukan koneksi  internet melalui modem saya sering sekali melakukan test dengan mengganti berbagai macam DNS Public untuk mempercepat koneksi ataupun membypass rule blokir dari provider internet  , Berikut daftarnya yang bisa anda coba, selamat mencoba ya :)

Open DNS
208.67.222.222
208.67.220.220

DNS Telkom
202.134.0.155 (nsjkt1.telkom.net.id)
203.130.196.155 (nsjkt2.telkom.net.id)
202.134.1.10 (nssby1.telkom.net.id)
202.134.2.5 (nsbdg1.telkom.net.id)
203.130.208.18 (nssmg1.telkom.net.id)
203.130.206.250 (nsmdn1.telkom.net.id
203.130.196.6 (ns1.telkom.net.id)
222.124.204.34 (ns2.telkom.net.id)
202.134.1.5 (ns3.telkom.net.id)

DNS Three
10.0.18.38
10.0.18.42

DNS Google
8.8.8.8
8.8.4.4

DNS ScrubIt
67.138.54.100
207.225.209.6

dnsadvantage
156.154.70.1
156.154.71.1
209.244.0.3
209.244.0.4

DNS OpenNIC
AU 58.6.115.42
AU 58.6.115.43
AU 119.31.230.42
BR 200.252.98.162
DE 217.79.186.148
FR 82.229.244.191
US 216.87.84.211
US 2002:d857:54d2:2:20e:2eff:fe63:d4a9
US 2001:470:1f07:38b::1
US 66.244.95.20
US 2001:470:1f10:c6::2
141.211.125.17
141.211.144.17
198.77.116.8
198.77.116.12
198.77.116.221
198.77.116.223
198.77.116.225
198.77.116.227
205.171.2.65
205.171.3.65
141.211.144.15
===========
202.138.224.2
202.155.0.155
202.146.255.5
===========
202.152.254.246
202.152.254.245
202.154.1.2
============
202.249.24.65
167.205.23.1
167.205.22.123
167.205.30.114
===========
222.124.22.18
===========
202.149.82.25
202.149.82.29
===========

Jumat, 06 Juli 2012

Belajar Linux - Install Nessus Pada Ubuntu Server 12.04


Bagi anda yang sudah terbiasa di dunia hacking atau security, mungkin sudah terbiasa dengan tools yang satu ini. Nessus merupakan favorit tools vulnerability assesment yang digemari sebagian besar orang. Kali ini saya mencoba menginstallnya pada platform ubuntu server 12.04
Ok kita mulai aja ya, lets do it.
1. Download terlebih dahulu aplikasi tersebut pada link dibawah ini pilih sesuai versi, kali ini saya menggunakan Nessus-5.0.1-ubuntu1110_i386.deb  yang dapat digunakan pada ubuntu versi  11 dan 12
http://www.nessus.org/products/nessus/nessus-download-agreement
2. Saat aplikasi sudah selesai di download kita mulai instalasi nya
root@Mini-Server:~# ls
LyncSetupEval.exe                      Nessus-5.0.1-ubuntu1110_i386.deb
metasploit-latest-linux-installer.run  yersinia.log
root@Mini-Server:~# chmod 777 Nessus-5.0.1-ubuntu1110_i386.deb
root@Mini-Server:~# dpkg -i Nessus-5.0.1-ubuntu1110_i386.deb
Selecting previously unselected package nessus.
(Reading database ... 29772 files and directories currently installed.)
Unpacking nessus (from Nessus-5.0.1-ubuntu1110_i386.deb) ...
Setting up nessus (5.0.1) ...
nessusd (Nessus) 5.0.1 [build R23111] for Linux
(C) 1998 - 2012 Tenable Network Security, Inc.
Processing the Nessus plugins...
[##################################################]
All plugins loaded
 - You can start nessusd by typing /etc/init.d/nessusd start
 - Then go to https://Mini-Server.depkeu.go.id:8834/ to configure your scanner
Processing triggers for ureadahead ...
ureadahead will be reprofiled on next reboot
3 .Restart aplikasi tersebut dan buatlah user untuk digunakan
root@Mini-Server:~# /etc/init.d/nessusd start
$Starting Nessus : .
root@Mini-Server:~# /opt/nessus/sbin/nessus-adduser
Login : root
Login password :
Login password (again) :
Do you want this user to be a Nessus 'admin' user ? (can upload plugins, etc...) (y/n) [n]: Y
User rules
----------
nessusd has a rules system which allows you to restrict the hosts
that root has the right to test. For instance, you may want
him to be able to scan his own host only.
Please see the nessus-adduser manual for the rules syntax
Enter the rules for this user, and enter a BLANK LINE once you are done :
(the user can have an empty rules set)
Login             : root
Password         : ***********
This user will have 'admin' privileges within the Nessus server
Rules             :
Is that ok ? (y/n) [y] Y
User added
root@Mini-Server:~#
4. Lakukan aktivasi code ( activation code dapat diperoleh disini : http://www.nessus.org/register ) dan install  plugin
root@Mini-Server:~# /opt/nessus/bin/nessus-fetch --register 9AB5-F30E-9104-0BCA-B162
Your Activation Code has been registered properly - thank you.
Now fetching the newest plugin set from plugins.nessus.org...
Your Nessus installation is now up-to-date.
If auto_update is set to 'yes' in nessusd.conf, Nessus will
update the plugins by itself.
5. Setelah semua selesai restart kembali aplikasi tersebut
root@Mini-Server:~# /etc/init.d/nessusd restart
$Shutting down Nessus : .
$Starting Nessus : .
root@Mini-Server:~#
6.  Nessus sudah bisa digunakan dengan mengaksesnya langsung dengan browser secara localhost atau  ip addres langsung. Selamat mencoba.
https://127.0.0.1:8834 atau https://< IP Address>:8834


Jumat, 16 Maret 2012

Belajar Linux - Firestarter, simple firewall on ubuntu


Demi untuk menjaga agar user client tidak membuka alamat-alamat tertentu yang mengandung virus atau yang lainnya, server ubuntu memberikan tool yang cukup sederhana dan mudah sebagai firewall. tool tersebut adalah firestartar, walaupun cukup sederhana tapi mempunyai fitur yang lengkap.
fitur firestarter
  • Open source, alias gratis
  • user friendly, mudah dalam pengoperasian
  • seting dengan kemudahan
  • bisa di gunakan di desktop, server dan gateway
  • real time firewall tentang apa yang terjadi di jaringan
  • support internet connection sharing dan optional DHCP
  • mematau koneksi jaringan yang aktif
  • support port forwarding

Instalasi firestarter
sudo apt-get install firestarter
Maka instalasi akan berjalan.
interface dan penggunaan dasar
  • The firewall wizard
    The wizard akan membantu anda mengkonfigurasi aplikasi pada saat firestaff dijalankan pertama kali.
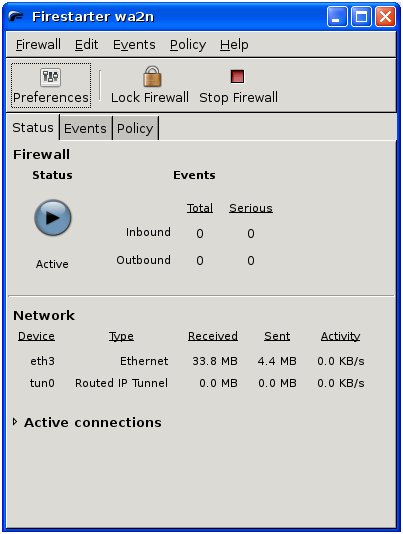
  • The status page
    Halaman ini adalah inferface utaman yang memperlihatkan kondisi firewall apakan dalam kondisi start atau berhenti.
  • The events page
    Merupakan halama kedia yang berisi history dari firewall
  • The policy page
    Halaman terakhir yang berisi review dari access policy. alamat web mana yang boleh diakses dan bisa diakses.
  • The preferences
    konfigurasi dari firestarter.
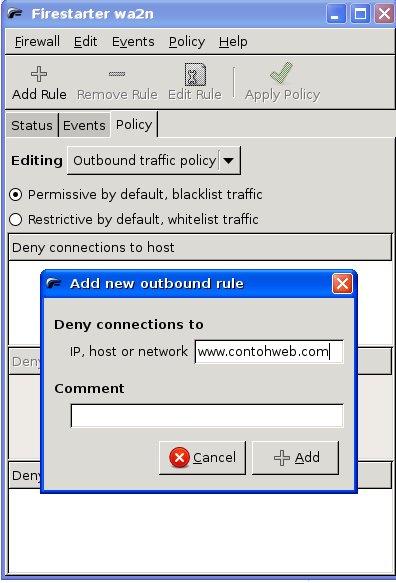
Penggunakan policy page
Misalkan kita akan memblog alamat web tertentu, masuk ke halmaan policy, kemudian pilih editing Outbond, klik kanan di kolom deny connection host, kemudian add rule, masukkan alamat web yang akan di blok.

Belajar Linux - How to disable Ping response in Ubuntu


If you want to disable ping response in your ubuntu to protect your machine.You can try following commands in terminal.
First of all,open up a terminal window from Applications->Accessories menu and run this to get super user privilege:
sudo -i
Then:
Method 1:
run this command to disable ping response:
echo 1 > /proc/sys/net/ipv4/icmp_echo_ignore_all
and you can type this to re-enable:
echo 0 > /proc/sys/net/ipv4/icmp_echo_ignore_all
Method 2:
run this to disable ping response:
iptables -I INPUT -i ech0 -p icmp -s 0/0 -d 0/0 -j DROP
and this to allow ping response:
iptables -I INPUT -i ech0 -p icmp -s 0/0 -d 0/0 -j ACCEPT

Kamis, 22 September 2011

CARA ROOT ANDROID SAMSUNG


Buat Pemilik HP Android yang ingin mencoba menjadi superuser dapat dilakukan dengan cara me root.
Dengan memiliki akses root atau superuser banyak hal yg bisa dilakukan seperti :
  1. memindahkan aplikasi yg terinstall pada memory phone ke memory eksternal
  2. melakukan backup semua aplikasi ke memory eksternal
  3. mengaktifkan swap / virtual memory
  4. menginstall aplikasi yg membutuhkan akses superuser/root
  5. dll
Untuk meroot caranya sangat mudah :
  • Instal dulu Kies(Samsung),driver,serta pastikan USB Debugging ON.
  • Unduh SuperOneClicknya versi 2.1.1 ==> Disini
  • Sambungkan Hp/Gadget kita ke komputer melalui kabel USB.
  • Buka SuperOneClicknya (khusus di Vista n 7,harus sebagai admin biar jalan Appny).
  • Click Root dan berdoa (klo mau ^^).
  • Tunggu sampai selesai gak lama kok ^_^
  • Saat ada jendela test run,test aja.
  • Selesai. Ada jendela donasi. Klo mau donasi,donasi. Tapi saran ku gak usah ya he..he..
Selamat, hp kamu udah di Root dan menjadi superuser . Klo udah di Root,coba cek di menu. Pasti ada yang namanya App Superuser(droidny kena silang X). Nah,klo mau buang aplikasi bawaan,juga bisa. Semuanya terserah kamu. Klo mau unroot sih,gampang.

Caranya :

  • Sambungkan Hp/Gadget ke komputer melalui kabel USB.
  • Jalankan lagi SuperOneClick(Vista n 7,harus sebagai admin).
  • Klik tombol Unroot.
  • Selesai deh.

Rabu, 04 Mei 2011

Belajar Linux - Install Modem Vodavone di Ubuntu 10.10

yang saya lakukan antara lain.
Pertama melakukan update network-manager versi terbaru, buka terminal (pastikan komputer/laptop anda telah tersambung dengan internet) kemudian ketik:
sudo add-apt-repository ppa:network-manager/trunk

Kedua, lakukan update repository. Ketik :
sudo apt-get update
Ketiga, Install update :
sudo apt-get install network-manager network-manager-gnome

Setelah network-manager versi terbaru selesai terpasang kita lanjutkan ke tahap Konfigurasi:

Tahap I:

1. Konfigurasi dilakukan di "Network Connections"
2.Pilih "VPN Connections" / "Configure VPN"
3. Pilih Mobile Broadband lalu klik Add, ikuti langkah"nya, setelah itu pilih Indosat karena provider itu yg saya gunakan
4. Pada bagian "Select Your Plan:" pilih "My plan is not listed" dan isi dengan "indosatm2"
5. lalu Apply

Tahap II (Edit ):
1. Basic:
  • Number: *99#
  • username/ password: username/password kartu im2 anda

2. Bagian PPP Settings
  • Pada bagian Allowed methods: pilih "PAP"
Selesai ,cukup mudah kan ^_^.

Rabu, 30 Maret 2011

Belajar Linux - Mengatasi GPG error pada Linux


kemarin saya mencoba mengupdate firefox 4 dengan menambahkan repository secara manual seperti ini ,tapi ternyata pas update gagal / eror ,waduh knapa ya?, eh pas di periksa ternyata gpg-keynya nih erorr .
root@heri-Desktop:~# ppa:mozillateam/firefox-stable
root@heri-Desktop:~# add-apt-repository ppa:mozillateam/firefox-stable
root@heri-Desktop:~# apt-get update
Terpaksa input manual deh gpg-keynya ,dan akhirnya berhasil , Allhamdulillah

root@heri-Desktop:~# gpg --keyserver keyserver.ubuntu.com --recv 9BDB3D89CE49EC21
root@heri-Desktop:~# gpg --export --armor 9BDB3D89CE49EC21|apt-key add -
root@heri-Desktop:~# apt-get update
root@heri-Desktop:~# apt-get upgrade
root@heri-Desktop:~# apt-get

Sabtu, 19 Maret 2011

Belajar Linux - xrdp remote desktop di ubuntu

xrdp adalah salah satu aplikasi open source remote desktop protocol pada sistem operasi linux.
dengan aplikasi ini memungkinan komputer yang menggunakan sistem operasi linux dapat di remote oleh semua terminal server client baik itu windows atau pun linux yang menggunakan rdp client secara GUI .
Walaupun sebenarnya linux secara default sudah dapat di remote via console melalui SSH


Ok lets begin , saat ini linux yang digunakan adalah ubuntu 10.04 ^_^

pertama sebelum menginstal rdp instal terlebih dahulu tightvnc server
heri@heridoank:~$ sudo -s
root@heridoank:~# apt-get install tightvncserver
Setelah semua paket terinstall lanjutkan untuk menginstall xrdp

root@heridoank:~# apt-get install xrdp


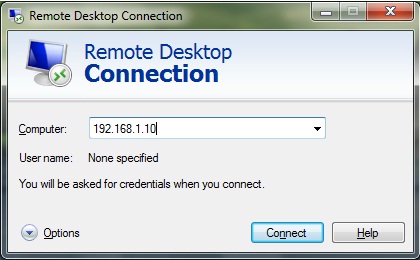
saat nya mencoba meremote pc linux tersebut dari windows
dari menu run ketikan : mstsc lalu masukan ip tujuan

Setelah menu Login muncul masukan user dan password

Akhirnya proses remote pun berhasil

Kamis, 17 Maret 2011

Belajar Linux - MOCP( Music On Console Player ) simple MP3 player di ubuntu


Banyak pemutar mp3 yang bisa di jalan kan under linux seperti : amarok, vlc ,xmms ,mplayer dll.
Salah satu yang paling simple adalah MOCP


langsung kita coba

pertama, ketikan perintah ini:
root@heri-desktop:~# mocp
Jika belum terinstall install dulu MOC-nya, dengan perintah:
root@heri-desktop:~# apt-get install moc

Perintah-perintah dasar di MOC:
Shiff + T : Untuk mengganti theme
S : untuk Stop
q (q kecil): untuk close tanpa menghentikan lagu yang sedang diputar
Q (Q besar) : untuk close+stop lagu
Untuk lebih lengkapnya tekan H( For Help )

Senin, 07 Maret 2011

Belajar Linux - MacBuntu

32-bit version:
macbuntuiso1010i386.iso
Macbuntu-iso1010i386.torrent
md5sum: 07356459b7b7d8c12204741ad1c0ac19
64-bit version:
macbuntuiso1010amd64.iso
macbuntu-iso1010amd64.torrent
md5sum: 0525bb70e163a7cb105aaa96370cea77

More Screendumps.

Kamis, 02 Desember 2010

List Free Proxy


Dalam network komputer ,proxy server adalah sebuah server(system komputer atau sebuah program applikasi)yang bertindak sebagai penengah atas request dari client(kita) atau user yang mencari service dari server2 lain(misal nya situs dll),client menghubungkan dirinya ke sebuah proxy server,me-request beberapa service seperti file (temporary file atau pun download request),koneksi,web page ,dll.yang tersedia di berbagai server. proxy server mengevaluasi request dari client berdasarkan dari system filternya sndiri. sebagai contoh memfilter trafic dari IP tertentu atau protocol. jika request di validasi oleh system filter nya,maka proxynya akan menyediakan berbagai service dengan cara menghubungkan client dengan server tertentu

jika ada di antara kamu yang ga bisa membuka situs-situs tertentu karena di blok oleh admin nya seperti facebook atauf friendster ,karena berada di lingkungan sekolah atau kantor,kamu bisa mencoba beberapa web-based anonym proxy di bawah ini. . .

easy to use

ini dia daftar nya :

Anonymouse - a very good free anonymizer. By using this CGI proxy you can anonymously surf web pages, send anonymous e-mails and look at news.
URL (for proxy chaining):
http://anonymouse.ws/

ShadowBrowser - anonymously surf the internet and protect your Internet history at the same time. No software to download and supports SSL websites.

www.ProxyKing.net - This anonymizer service keeps websites from tracking your internet movements by preventing them from placing cookies on your home computer.
URL (for making proxy chaining):
http://www.proxyking.net/

AnonymousIndex.com - Anonymous private surfing service, hide your ip, manage website ads, referrers and cookies through this free web based proxy.
URL (for proxy chaining):
http://www.anonymousindex.com

www.HideMyAss.com - Free anonymous browsing, for the times when you REALLY need to hide your ass online!
URL (for proxy chaining):
http://www.hidemyass.com/

Proxy7.com - Free webbased proxy. By using this proxy you can surf the Internet securely and safely. This anonymizer service keeps websites from tracking your internet movements by preventing them from placing cookies on your home computer.
URL (for proxy-chains):
http://www.proxy7.com/

www.ProxyFoxy.com - Proxy Foxy offers you free anonymous surfing. With our free tool you can surf the Internet safe and secure without revealing your identity. Avoid cookies, spyware and other malicious scripts.
URL (for making proxy chaining):
http://www.proxyfoxy.com/

78Y.NET - It is a web anonymous web proxy designed to bypass proxy restrictions through a web interface. If, for example, in your university, college, job, etc, the IT department blocks a lot of harmless websites simply because of their popularity, so you can use 78Y.NET proxy service to access those websites.
URL (to create proxy chains):
http://www.78y.net/

www.75i.net - 75I.NET is anonymous CGI Proxy that allows anyone to surf the Internet privately and securely without any restrictions. 75I.NET anonymous web surfing proxy service is free.
URL (to create chains of proxies):
http://www.75i.net/

www.dzzt.com - This anonymizer always hides your IP address, so all sites will not be able to uniquely your identify or track you. You're able to access from your school, college, university, etc, the websites, which are restricted by your IT department.
URL (for proxy chaining):
http://www.dzzt.com/

Proxy Guy - The Proxy Guy offers free anonymous surfing. Now you can surf safe and secure with the click of a button.
URL (for making proxy chaining):
http://www.proxyguy.com/

www.GamesProxy.com - Games Proxy helps you to play all your favourite flash games free online by using fast secure web proxy. Apart from playing free flash games you can also use Games Proxy to browse all your favourite sites such as ebay, hotmail & more!

www.proxyz.be - It is a free internet service which allows you to surf anonymously and it "changes" your ip. You can also use it to access/bypass blocked websites on your school or office.
URL (for making proxy chaining):
http://www.proxyz.be/

www.antifw.tk - Anti-firewall redirector. It allows to hide your IP and a name and a type of the file you gets from internet. Now corporate internet firewall will not be able to determine your internet activity.

www.ProxyHero.com - Fast and Secure US Proxy. PHP Based, and very easy to use. Completely free, and will keep you anonymous while browsing the internet.
URL (for making proxy chaining):
http://www.proxyhero.com/

www.ProxyDrop.com - This is a free CGI proxy with HTTPS support. This service also includes the usual features including removing client side scripting, showing text only and enabling or disabling cookies. It also supports rotate13 or base64 URL encoding. Mirror1 Mirror2 Mirror3 Mirror4
URL (for making proxy chaining):
http://www.proxydrop.com/
http://www.proxydrop.net/
http://www.proxydrop.biz/
http://www.proxydrop.info/
http://www.proxydrop.org/

www.prx1.com - This is a free, safe, anonymous web proxy with configurable options. Browsing anonymously with prx1.com increases your security and lets you access web sites from behind a firewall.
URL (for making proxy chains):
http://www.prx1.com/

www.ninjaproxy.com - It is a free anonymous web based proxy service. With Ninja Proxy you can browse your favorite web sites anonymously and even from behind a firewall with blocked ports.
URL (for making proxy chains):
http://www.ninjaproxy.com/

ShadowSurf free anonymous proxy - Surf privately and 100% anonymously with ShadowSurf's FREE web proxy. You can access blocked sites while keeping your IP secret. No software needed.
URL (for making proxy chaining):
http://www.shadowsurf.com/

Famous5.net Proxy - Free browser based anonymizer without any software. Bypass bans and hide your ip through famous5.net proxy.
URL (for making proxy chains):
http://www.famous5.net/

No1Proxy.com - Free proxy site with a cgi proxy tool, daily updated proxy lists and information on anonymous and https proxy servers.
URL (for creating proxy chain):
http://www.no1proxy.com/

ProxySpy.com - Proxy Spy protects your privacy and keeps your computer secure by allowing you without revealing your IP address or personal information. Proxy Spy has a range of features including disabling javascript, encoding URLs to bypass filters, disable showing of images, reject cookies etc. Proxy Spy is hosted on a fast server with high uptime - this means you can always count on it, day or night, to protect you.

TheProxy.be - TheProxy always hides your IP address, so all sites will not be able to uniquely your identify or track you. It`s absolutely free. Mirror Mirror1
URL (for making proxy chains):
http://www.theproxy.be/
http://www.newproxy.be/
http://www.smartproxy.net/

ProxyPrince.com - Very fast US based PHP proxy. Very easy to use, and very quick. ProxyPrince will keep you safe and secure. Anonimity is our main concern, your tracks are sure to be kept hidden.

PimpMyIP.com - Free anonymous web proxy. Bypass blocked websites and browse privately at work or school. Shields you against cookies, spyware and malicious scripts.

OhMyProxy.com - Free Anonymous Browsing. Hide your IP and get past school and work filters.

Clever Proxy - Clever Proxy is a smart and intelligent web-based proxy service. It allows you to remain anonymous whilst using the internet. By using this anonymizer you will also be protecting your computer because when you surf anonymously people cannot find out your IP address and attempt to hack you.

A Proxy Site - A Proxy Site is a simple and reliable web-based anonymizer. By using it you can bypass filters and remain completely anonymous whilst surfing the internet. It has many features including blocking JavaScript and cookies.

Fully Sick Proxy - Fully Sick proxy allows you to remain anonymous on the internet by routing web requests for you. This means you can stay protected and also disable javascript and block cookies. Our site is fast and reliable too.

Desire Proxy - Desire proxy is a premium free anonymous proxy. It provides many of the features of the paid services for nothing! These include cookie removal, no image browsing and more. Keep anonymous and keep secure with Desire Proxy. We know what you desire!

Perfect Proxy - Perfect Proxy is just that - perfect! It provides excellent reliability and website support and also keeps you anonymous in the process. It has many additional features to add to the experience.

Prime Proxy - Prime Proxy provides a great free proxy service to the general public. It keeps you anonymous and safe whilst browsing your favorite websites. Prime Proxy is used by students and adults in many different situations. Try us today - it's 100% free!

Proxy Aware - Since you're visiting freeproxy.ru you must be proxy aware, so why not check out Proxy Aware? It's a perfect free proxy which keeps you anonymous whilst browsing the web! It has many additional features such as cookie blocking, disabling images and URL encoding to bypass school and work filters.

Proxy Craze - At the moment there is a proxy craze going on, and Proxy Craze is proud to be part of it! With a delicious serving of features to make any proxy user cry, Proxy Craze is the proxy of choice! Features include URL encoding, cookie blocking / image blocking, and a neat interface!

Proxy Gasp - Our proxy is so good it will make you gasp - as the name suggests. To use this proxy simply type the URL into the website and gasp.your at the site remaining totally anonymous! This means websites cannot record your IP and later use it to hack or send you junk!

Proxy Please - Well, thanks for saying please! This is a great proxy site with all the usual features including cookie blocking, no images, URL encoding all whilst being extremely fast and reliable. If you want to bypass filters then this is the site you need!

Some Proxy - Easy to remember domain, great features, and nice and fast! Keeps you totally anonymous whilst browsing the internet, and allows you to bypass filters and school or at work. Features include URL encoding and cookie blocking!

Stupid Proxy - Despite the name, this proxy is anything but stupid! If you're going to use a proxy, use Stupid Proxy! It's no frills yet great to use including many simple features that will make your life easier including URL encoding (bypass filters) and imageless browsing. Enjoy!

That Proxy - Which proxy - this proxy? Why not! A bunch of excellent features, fast and reliable and a clean and neat design are all reasons why you should choose 'That Proxy'! By using our site you will remain anonymous and avoid security issues like people hacking your computer.

Want Proxy - For you to be at this site you must want some proxy, so all you need to do is type that in, and finish it with a .com, and you're done! 'Want Proxy' is an excellent proxy site that you'll end up using all the time. It's a favorite amongst students and workers who want to bypass filters.

www.UnBlockMySpace.com - Unblock MySpace is a free service created to view MySpace proxy website from school and work computers through a PHP and CGI backend (web based proxy). This site uses the server proxy IP for surfing the web anonymously. Protect your privacy! Surf Anonymously! Bypass Security Filters! Private Browsing!

www.ProxyForAll.com - Free and secure cgi web based proxy site. Surf the net from Work, school or home. Keep your info safe from hackers.

www.MyProxySurfer.com - Free and secure cgi web based proxy site. Surf the net from Work, school or home. Keep your info safe from hackers.

www.ProxyCat.com - Proxycat.com is a free easy to use cgi proxy service that blocks cookies and hides your IP to keep you anonymous as you surf the web.

www.ProxyDetective.com - ProxyDetective - Simple and Free cgi-webbased anonymous proxy surfing. Surf safely from your work, school or home.

www.indianproxy.com - Access your webmail, myspace, and much more in school or work anonymously.

www.proxybrowsing.com - Access blocked websites in school or work safely and anonymously. Surf with Ad Free Browsing Pages!

www.ProxyPi.com - We do not sleep until you have a safe route. Use us at school, work or home. We can bypass most filters.

www.proxyjet.com - Hide your movements via our anonymous proxy. Our proxy will bypass school and work filters.

www.justhide.com - We allow you to bypass your school and work filters to allow you surf the internet anonymously.
Other anonymizers

Anonymization - free web anonymyzer. Supports anonymous web surfing, anonymous web seek (meta search by many search engines) and FTP surf - surf anonymously in any FTP server. By using this web proxy you can surf anonymously more than 5.000.000.000 web pages.
URL (for proxy chaining):
http://www.anonymization.net/

Guardster - good anonymizer. Controls cookies, scripts, ADs, images and referrers.
URL (for proxy chaining):
http://www.guardster.com/

ProxyWeb - good anonymizer, can delete Java, JavaScript, cookies and ActiveX. Also this web proxy uses HTTPS (secure) connection - so nobody can detect what you download from Internet.
URL (for proxy chaining):
http://www.proxyweb.net/

WebWarper - This is a popular free web anonymizer. This CGI proxy can pack web pages "on the fly".
URL (for proxy chaining):
http://webwarper.net/

MegaProxy - Free anonymizer can work with HTTPS sites.
URL (for proxy chaining):
http://www.megaproxy.com/
http://www.amegaproxy.com/

W3Privacy.com - free web based anonymizing proxy. Instant access, no download, no registration, and no fee required.
URL (for proxy chaining):
http://www.w3privacy.com/

Anonymizer.RU - russian anonymizer: this russian CGI proxy has many additional options only after registration.
URL (for proxy chaining):
http://www.anonymizer.ru/

The-cloak - This is a free CGI proxy. This anonymizer supports HTTP, FTP and HTTPS sessions. Can hide referrers. Requires payment..
URL (for chaining proxy):
http://www.the-cloak.com/

Pure privacy - cool anonymizer + remailer. You can use this anonymizer to send anonymous e-mails (by using this anonymizer with anonymous proxy)
URL (for proxy chaining):
http://www.pureprivacy.com/

Proxify.com - Good fast anonymizer that can remove cookies, ADs, referrers and can use HTTPS connections.
URL (for proxy chaining):
http://proxify.com/

http://www.urlencoded.com/ - The better cgi proxy server. It has many different features, inclusive enabling / disabling cookies, all scripts, AD banners, referrer information, browser and OS info and many more.
URL (for cgi proxy chaining):
http://www.urlencoded.com/

http://www.snoopblocker.com/ - Good cgi proxy (anonymizer). It uses 128-bit SSL-encoding. Can enable/lock Java, JavaScript, Cookies, ActiveX.
URL (for creating anonymizers chain):
http://www.snoopblocker.com/

http://www.long999.com/ - Mirror

www.psurf.net - Psurf is one of the fatest proxy services on the net. Using new and advanced technology to help you bypass your school firewalls and filters. Allowing you to view what you want, when you want!

http://www.phproxy.info/ - mirror1 mirror2 mirror3

http://www.proxy121.com/ - The 121 relationship between you and annonimity. Fast, reliable and secure! Mirror1
http://www.bigate.com/cgi-bin/bigate/b/k/k/
http://www.userbeam.de/
http://www.calcmaster.net/
http://www.misterprivacy.com/begin_anonymous_surfing.htm
http://www.myshield.com/
http://www.idzap.com/
http://www.safegatetech.com/
http://www.breiter.ch/
http://www.rrdb.org/rrdbproxy.php?l=en
http://proxy.decodes.biz/
http://proxy.mxds.ch/
http://www.spondoo.com/
http://search.sicomm.us/
http://schnarre-monika.celebrityblog.net/cache.cgi
http://filter2005.com/
http://www.kproxy.com/
http://www.websitereactor.org/cgi-bin/001/nph-.pl
http://www.goproxing.com/
http://anonycat.com/
http://www.spynot.com/
http://www.merletn.org/anonymizer
http://www.cgi-proxy.net/
http://www.proxymouse.com/
http://www.theunblocker.tk/
http://www.betaproxy.com/
http://www.letsproxy.com/
http://www.freeproxysurf.info/
http://www.mysticproxy.com/
http://www.proxywave.com/
http://www.vtunnel.com/
http://www.proxysnail.com/
http://www.freeproxy.ca/
http://basic.3proxy.com/
http://www.privatebrowsing.com/
http://www.hackingtruths.org/proxy
http://xanproxy.be/
http://www.ipsecret.com/
http://www.proxyanon.com/
http://www.anonproxy.info/
http://www.proxysafe.com/
http://www.strongproxy.com/
http://www.boredatschool.net/
http://www.ukproxy.com/
http://www.simpleproxy.com/
http://www.phproxy.org/
http://surfonym.com/
http://geoepker.hu/freeproxy/
http://www.browseatwork.com/
http://www.ipblocker.info/
http://www.boredatwork.info/
http://www.anonymousurfing.info/
http://www.browsingwork.com/
http://www.freeproxyserver.org/
http://www.browseany.com/
http://www.browsesecurely.com/
http://IEproxy.com/
http://www.sneak3.po.gs/
http://www.proxytastic.com/
http://www.freewebproxy.org/
http://www.thecgiproxy.com/
http://www.hide-me.be/
http://www.anotherproxy.com/
http://www.proxy77.com/
http://www.surf-anon.com/
http://www.free-proxy.info/
http://www.theproxysite.info/
http://www.proxyify.info/
http://www.concealme.com/
http://browseschool.info/
http://browsework.info/
http://browsingschool.info/
http://browsingwork.info/
http://browsingschool.com/
http://www.proxyindex.com/
http://www.gobyproxy.com/
http://www.proxifyme.com/
http://www.proxyghost.com/
http://www.spysurfing.com/
http://www.unblockthis.com/
http://www.proxyserver7.com/
http://www.daveproxy.co.uk/
http://www.tntproxy.com/
http://www.neoproxy.net/
http://www.bypassbrowser.com/
http://www.procksie.com/
http://www.httproxy.com/
http://www.cgiproxy.info/
http://www.silentsurf.com/cgi-bin/nph-index.cgi
http://www.proxy-sock.com/
http://www.proxygeek.com/
http://www.datadefense.org/
http://www.hideyour.info/
http://www.howto.pro/
http://www.collegeproxy.com/
http://www.demonproxy.com/
http://www.satanproxy.com/
http://www.hidingyou.com/
http://www.intelliproxy.com/
http://www.fireprox.com/
http://www.h0h0h0.com/firewall/
http://www.katedrala.cz/
http://www.browseatwork.net/
http://www.2255.info/
http://www.vproxy.be/
http://www.boxproxy.com/
http://www.nopimps.com/
http://www.fsurf.com/
http://www.proxylord.com/
http://roachhost.com/hp/
http://www.freepr0xy.com/
http://www.proxypop.com/
http://proxy.winidn.com/
http://www.cloax.net/
http://www.proxy247.com/
http://www.traceless.com/
http://www.siatec.net/proxyanonymizer
http://www.stealth-ip.net/
http://www.proxywhip.com/
http://www.proxy-surf.net/
http://www.videoeditors.info/proxy/
http://www.blockmy.info/
http://www.proxychatroom.com/
http://www.teenproxy.com/
http://www.totalupload.com/surf/
http://www.proxene.com/
http://www.fileshack.us/proxy.php
http://www.cloaker.ca/
http://www.proxified.net/
http://www.mrreid.net/

Senin, 08 November 2010

Belajar Linux - Mengamankan Service SSH

SSH yaitu sebuah daemon untuk meremote sebuah komputer dari jauh dalam hal ini biasanya server yang akan diremote. Biasanya administrator sebuah server tidak bisa selalu ada ditempat maka ia menggunakan ssh untuk bisa meremote server tersebut dari jauh , mungkin dari rumahnya. Tetapi bila service ssh ini tidak dikonfigurasi dengan baik maka bisa menjadi senjata makan tuan dan digunakan oleh orang lain untuk meng hack server tersebut.

Bila kita membicarakan soal keamanan server maka mungkin ssh merupakan service yang paling banyak disukai para hacker karena melalui ssh mereka dapat masuk ke shell konsole dan dapat melakukan perintah untuk mengambil alih server tersebut. Maka apabila hacker melihat server yang akan ia hack membuka port ssh nya maka dia akan senang sekali dan itulah yang pertama akan ia serang. Jadi ssh merupakan pintu pertama pengamanan server anda dari serangan melalui network/internet.

Sekarang pertanyaannya bagaimana kita bisa mengamankan service tersebut. Pertama-tama kita harus tahu terlebih dahulu apakah SSH itu. OpenSSH merupakan sebuah aplikasi remote login yang dikembangkan untuk menggantikan rlogin dan rsh ,dengan ssh keamanan remote lebih tinggi karena menggunakan komunikasi yang terenkripsi antara dua host. Untuk lebih detailnya bisa anda cari sendiri di om google karena bila dijelaskan disini tentu akan panjang sekali. Untuk bisa melakukan ssh maka kita perlu menginstall aplikasi ssh-server dan ssh-client, ssh-server untuk host yang akan diremote dan ssh-client untuk meremote host. Tetapi biasanya semua distribusi linux biasanya sudah membundel ssh pada default instalasinya. Bila ssh belum terinstalai pada komputer anda maka gunakan manajemen paket pada distribusi linux yang anda gunakan untuk menginstall aplikasi ssh dari CD atau DVD instalasinya.

Nah setelah aplikasi ssh telah terinstall pada komputer anda sekarang kita mengkonfigurasinya agar aman dari tangan-tangan jahil yang mencoba masuk ke server kita menggunakan ssh. Oke sekarang kita buka file konfigurasi ssh pada "⁄etc⁄ssh⁄sshd.conf" , buka file tersebut dengan editor kesayangan anda. Karena saya menggunakan Fedora Core maka file tersebut berada di "⁄etc⁄ssh⁄sshd.conf" , mungkin berbeda pada distro lainnya tetapi biasanya ada pada direktori "⁄etc⁄ssh⁄" . Oke sudah dibuka file tersebut ,sekarang coba dibaca-baca dulu sebentar untuk melihat konfigurasinya mungkin saja anda bisa mengerti dan melakukan konfigurasi sesuai dengan keinginan anda. Jangan lupa backup dahulu file tersebut agar bila nantinya anda salah mengkonfigurasi masih ada file aslinya.

[root@www ~]# cp ⁄etc⁄ssh⁄sshd_config ⁄etc⁄ssh⁄sshd_config.old

Lalu buka file ⁄etc⁄ssh⁄sshd.conf
[root@www ~]# vi ⁄etc⁄ssh⁄sshd_config

Sudah belum baca-bacanya karena sekarang kita akan mengkonfigurasi file ini. Sekarang yang pelru diamankan adalah mencegah untuk login remote melalaui ssh dengan menggunakan user root kenapa kita melakukan ini , sekarang coba kita pikirkan apabila kita mencoba masuk ke server orang lain melalui ssh tentu kita perlu sebuah user yang ada pada server tersebutagar bisa login iya apa iya, kita pasti tidak tahu nama-nama user yang ada pada server tersebut bukan tetapi pasti ada satu user yang pasti ada pada server tersebut yang juga ada pada setiap server yang menggunakan linux sebagai OS nya, ya anda benar root pasti ada maka seorang hacker pasti akan mencoba user root pertama kali karena hanya user tersebut yang dia tahu yang pasti ada pada server. Apabila kita tidak mencegah dan membiarkan root bisa login melalui ssh maka mungkin saja hacker akan menggunakan user tersebut dan menggunakan brute force untuk mencari tahu passwordnya. Oleh karena itu jangan biarkan root bisa login melalui ssh. Udah ah penjelasannya sekarang konfigurasinya, pada file sshd.conf cari parameter PermitRootLogin parameter ini untuk menkonfigurasi apakah root bisa login atau tidak. Pada Fedora Core secara default parameter tersebut di comment dan default valuenya adalah yes jadi root bisa login menggunakan ssh. Mungkin pada distro lain default valuenya berbeda seperti pada Ubuntu default valuenya no. Jadi kita perlu mengubah parameter tersebut untuk mencegah root login , cari parameter ini pada file sshd.conf
#PermitRootLogin yes

Uncomment baris tersebut dan ubah valuenya menjadi no seperti ini
PermitRootLogin no

Sekarang coba restart service ssh anda dan coba ssh komputer anda dengan user root bila tidak bisa maka anda berhasil .Konfigurasi yang kedua yaitu membatasi inputan password salah , bila kita remote komputer melalui ssh bila password kita salah maka kita pasti disuruh mencoba lagi kita bisa membatasi inputan tersebut agar hacker tidak bisa menggunakan brute force untuk mengcrack password kita. Untuk bisa menset inputan password tersebut cari parameter berikut pada file sshd.conf
#MaxAuthTries 6

Secara default kita bisa input password 6 kali bila salah kita bisa merubah valuenya dengan uncomment parameter tersebut dan beri value dengan angka yang anda inginkan seperti ini
MaxAuthTries 3

Selanjutnya untuk lebih aman lagi kita harus membatasi user yang bisa melakukan ssh ke server kita karena user dalam komputer kita banyak dan hanya user tertentu saja yang bisa login ssh dan belum lagi user system⁄aplikasi jadi kita harus membatasi user yang bisa ssh. Untuk bisa melakukan itu tambah kan baris berikut pada bagian bawah file sshd.conf
AllowUsers namauser1 namauser2

Ganti namauser1 dan namauser2 dengan user yang anda inginkan, ingat user tersebut harus ada pada komputer anda. Anda juga bisa memblock user yang anda tidak inginkan untuk login ssh dengan menambahkan parameter berikut pada baris terakhir file sshd.conf
DenyUsers namauser1 namauser2

Jangan lupa ganti namauser1 dan namauser2 dengan user yang anda inginkan. Perlu saya tambahkan apabila anda mengunakan AllowUsers maka user lain yang tidak disebutkan pada parameter tersebut akan di deny dan apabila anda menggunakan DenyUsers maka user lain yang tidak disebutkan pada parameter tersebut akan bisa login jadi anda hanya perlu menggunakan satu parameter saja.
Kita juga bisa menset waktu dari user untuk user bisa meremote komputer kita jadi user akan automatic logout apabila telah logni melebihi waktu yang telah kita set. Untuk bisa memnegset waktunya cari parameter berikut ini
#LoginGraceTime 2m

Uncomment baris tersebut lalu ubah valuenya sesuai dengan yang anda inginkan seperti berikut ini saya menset waktu 1 jam untuk user dapat login
LoginGraceTime 60m

Lanjut lagi sekarang kita akan memanipulasi port uang digunakan ssh agar hacker tidak tahu yang masih cupu tidak tahu bahwa service ssh kita terbuka. Secara default port ssh adalah 22 tetapi kita bisa merubahnya menjadi nomor sesuai dengan yang kita inginkan. Untuk bisa mengubahnya cari parameter berikut ini
#Port 22

Uncomment baris tersebut dan ubah valuenya menjadi nomor port yang anda inginkan seperti ini saya akan memberi value 9000.
Port 9000

Maka sekarang ssh anda berjalan pada port 9000 kalo enggak percaya coba anda scan komputer anda dengan nmap
[root@www ~]# nmap localhost

Coba cari port 22 enggak ada kan adanya port 9000
Mungkin hanya ini saja komfigurasi yang bisa saya berikan anda bisa mencari sendiri konfigurasi lainnya dengan membaca manual pagenya ssh dengan perintah
[root@www ~]# man ssh

Lain waktu kita akan membahas bagaimana membuat user yang login menggunakan shell yang kita buat sendiri jadi user tidak bisa menggunakan perintah-perintah yang bisa dilakuakan pada shel biasa kita menset perintah-perintah pada shel yang kita buat tersebut.

Sabtu, 30 Oktober 2010

Belajar Linux - Step by step instalasi squid proxy di slackware

Berikut ini adalah Step by step instalasi squid proxy di slackware Saya asumsikan mesin slackware sudah terkoneksi dengan internet. Baiklah kita mulai langkah - langkahnya.

- login ke server dengan mengisikan username dan password

- download dulu paket squidnya, disini saya menggunakan squid-2.6.STABLE17
root@slackidsproxy:~# wget http://www.squid-cache.org/Versions/v2/2.6/squid-2.6.STABLE17.tar.gz

- kopikan file squid-2.6.STABLE17.tar.gz ke direktori /usr/local/
root@slackidsproxy:~# cp squid-2.6.STABLE17.tar.gz /usr/local/

- masuk ke direktori /usr/local/
root@slackidsproxy:~# cd /usr/local/

- ekstrak file squid-2.6.STABLE17.tar.gz ke direktori /usr/local
root@slackidsproxy:/usr/local# tar -zxvf squid-2.6.STABLE17.tar.gz

- masuk ke direktori squid-2.6.STABLE17
root@slackidsproxy:/usr/local# cd squid-2.6.STABLE17

- konfigurasi squid
root@slackidsproxy:/usr/local/squid-2.6.STABLE17# ./configure

- kompile dan instal squid
root@slackidsproxy:/usr/local/squid-2.6.STABLE17# make && make install

- buat user dan group squid
root@slackidsproxy:/usr/local/squid-2.6.STABLE17# groupadd squid
root@slackidsproxy:/usr/local/squid-2.6.STABLE17# useradd -c "SQUID PROXY CACHE" -d /dev/null -s /bin/false -g squid squid

- buat cache direktori dan rubah kepemilikan
root@slackidsproxy:/usr/local/squid-2.6.STABLE17# mkdir /var/spool/squid
root@slackidsproxy:/usr/local/squid-2.6.STABLE17# chown -R squid.squid /var/spool/squid

- buat file squid.pid dan rubah kepemilikan
root@slackidsproxy:/usr/local/squid-2.6.STABLE17# touch /var/run/squid.pid
root@slackidsproxy:/usr/local/squid-2.6.STABLE17# chown -R squid.squid /var/run/squid.pid

- buat direktori untuk file access.log dan rubah kepemilikan
root@slackidsproxy:/usr/local/squid-2.6.STABLE17# mkdir /var/log/squid
root@slackidsproxy:/usr/local/squid-2.6.STABLE17# touch /var/log/squid/access.log
root@slackidsproxy:/usr/local/squid-2.6.STABLE17# chown -R squid.squid /var/log/squid/access.log

- edit squid.conf nya
root@slackidsproxy:~# pico /usr/local/squid/etc/squid.conf

untuk isi dari squid.conf bisa anda sesuaikan sendiri, jika anda ingin copy contoh squid.conf saya, silahkan download disini.

- buat direktori swapnya (jalankan hanya satu kali saja)
root@slackidsproxy:~# /usr/local/squid/sbin/squid -z

- cek konfigurasi squid sudah benar atau belum (jika tidak ada pesan error brarti udah bener)
root@slackidsproxy:~# /usr/local/squid/sbin/squid -k parse

- menjalankan squid
root@slackidsproxy:~# /usr/local/squid/sbin/squid -D

- cek squid udah jalan ato belum
root@slackidsproxy:~# ps -x | grep squid

- karena pada konfigurasi squid menggunakan mode transparen pada port 8181 maka disini hanya perlu untuk membuat direct dari port 80 (http) ke port 8181 (transparent proxy)

iptables -t nat -A PREROUTING -i eth1 -p tcp –dport 80 -j REDIRECT –to-port 8181

Demikian step by step instalasi squid proxy

Sabtu, 24 April 2010

OPEN DNS Alternatif DNS Server buat speedy

Buat para pemakai telkom speedy pernah ngalamin gak ,koneksi putus2 ,terus lama bgt untuk ngeresolv alamat web yg kita buka ,memang smpet sebel juga sih sama dns servernya speedy yang dodol bgt.
Iseng iseng nyoba gonta ganti dns nya pake dns server yang gratisan dapet juga nih yg cukup handal namanya opendns

http://dopastorsdreamofelectricsheep.com/wp-content/uploads/2010/03/opendns_logo_300.gif

biarpun servernya di luar tp untuk ngeresolv alamat better lah dr punya nya speedy, dan akhirnya pake ini terus deh.
Buat para pemakai speedy dirumah ane saranin sih dns bawaan speedy masukin urutan ke 10 aja deh buat dipakai.

Oh ya ini ada bberapa DNS Sever yg mungkin bsa dicoba mungkin berguna,selamat mencoba .

Nawala Project - sangat di sarankan karena akan memblokir situs tidak baik & cukup stabil.

* 180.131.144.144 (primary)
* 180.131.145.145 (secondary)

OpenDNS - sangat di sarankan karena akan memblokir situs tidak baik & cukup stabil.

* 208.67.222.222
* 208.67.220.220

telkom.net.id Daftar DNS TelkomNet

* 202.155.0.20
* 202.155.0.15
* 202.134.0.62
* 202.134.0.155
* 202.134.1.10
* 202.134.2.5
* 203.130.196.5

cbn.net.id

* 202.158.40.1
* 202.158.20.1

indo.net.id

* 202.159.32.2
* 202.159.33.2

indosat.net.id

* 202.155.0.20
* 202.155.0.15
* 202.155.30.227

itb.ac.id

* 202.249.24.65
* 167.205.23.1
* 167.205.22.123
* 167.205.30.114

ukdw.ac.id

* 222.124.22.18

sat.net.id

* 202.149.82.25
* 202.149.82.29

Senin, 23 November 2009

Belajar Linux - Linux Crond Guide

1. Introduction
Every user as well as administrator of the linux system very often needs to execute some programs on regular basis. For example, an administrator may need to monitor a disk usage of a system. In this case a cron scheduler is very handy tool to achieve this. For example, if root needs to execute /usr/local/sbin/backup.sh script every Sunday at 2:36AM he would edit his crontab file as shown on the figure below:

# crontab -e


The format is simple, 6 fields separated with spaces or tabs. The rest of the line is the command, and it's parameters to be executed. The sixth field - user name (in blue) is used only in the system wide cron scheduler.


2. Cron job examples
Crontab Example 1: This crontab example runs updatedb command 35 minutes past every hour.

35 * * * * updatedb


Crontab Example 2: This crontab example runs /usr/local/bin/diskusage.sh every 5 minutes (e.g. 0, 5, 10, 15, ...).

*/5 * * * * /usr/local/bin/diskusage.sh


Crontab Example 3: This crontab example runs /usr/local/bin/diskusage.sh at 1:25 AM, 1:50 AM every Tuesday and on 15th of every month.

25,50 1 15 * 2 /usr/local/bin/diskusage.sh


Crontab Example 4: This crontab example runs /usr/local/bin/diskusage.sh at 2:00 PM on 10th of March, June, September and December.

00 14 10 3,6,9,12 * /usr/local/bin/diskusage.sh


Crontab Example 5: This crontab example runs '/usr/local/bin/diskusage.sh user@linuxconfig.sh' at 9.00 PM every Monday, Wednesday, Friday. Note: Using names for the week day and months is extension in some versions of crontab.

00 21 * * Mon,Wed,Fri /usr/local/bin/diskusage.sh user@linuxconfig.sh


Crontab Example 6: This crontab example runs /usr/local/bin/diskusage.sh every 5 minutes during the 5 working days (Monday - Friday), every week and month.

*/5 * * * 1-5 /usr/local/bin/diskusage.sh


Crontab Example 7: This crontab example runs /usr/local/bin/diskusage.sh every minute during the 4-th hour only in Sunday, every week and month. This is every minute from 0:00 till 0:59, then from 4:00 till 4:59, etc.

* */4 * * sun /usr/local/bin/diskusage.sh


3. System wide cron scheduler
As a Linux administrator you can also use predefined cron directories:

/etc/cron.d /etc/cron.daily /etc/cron.hourly /etc/cron.monthly /etc/cron.weekly


If root wishes to run backup.sh script once a week he will place backup.sh script into /etc/cron.weekly directory.

4. Cron Scheduler on user level
Every user can edit, view or remove his own crontab file. If the root user needs to change someone else's crontab file he must add '-u' option to specify the user name. To edit crontab file for user foobar we can use command:

# crontab -u foobar -e


Remove foobar's crontab file:

# crontab -u foobar -r


To view foobar's crontab content:

# crontab -u foobar -l

Senin, 06 Juli 2009

Install Ntop di ubuntu 9 alternatif traffic monitoring software

NTOP adalah salah satu program network monitoring selain mrtg,cacti atau nagios.
aplikasi ini dpt kita gunakan untuk memonitoring status atau traffic pada beberapa protokol sperti UDP, TCP, DNS, HTTP dan protokol yg lain.
Saat ini saya akan mencoba menginstallnya pada ubuntu 9.
  • Masuk mode root sudo
heri@heri-desktop:~$ sudo -s
[sudo] password for heri: **********
root@heri-desktop:~#
  • Install packet ntop
root@heri-desktop:~# apt-get install ntop
Reading package lists... Done
Building dependency tree
Reading state information... Done
The following extra packages will be installed:
librrd4
Suggested packages:
graphviz
The following NEW packages will be installed:
librrd4 ntop
0 upgraded, 2 newly installed, 0 to remove and 172 not upgraded.
Need to get 2902kB of archives.
After this operation, 11.6MB of additional disk space will be used.
Do you want to continue [Y/n]? y
Get:1 http://dl2.foss-id.web.id jaunty/main librrd4 1.3.1-4ubuntu1 [241kB]
Get:2 http://dl2.foss-id.web.id jaunty/universe ntop 3:3.3-11ubuntu1 [2661kB]
Fetched 2902kB in 1min 11s (40.4kB/s)
Preconfiguring packages ...
Selecting previously deselected package librrd4.
(Reading database ... 106179 files and directories currently installed.)
Unpacking librrd4 (from .../librrd4_1.3.1-4ubuntu1_i386.deb) ...
Selecting previously deselected package ntop.
Unpacking ntop (from .../ntop_3%3a3.3-11ubuntu1_i386.deb) ...
Processing triggers for man-db ...
Setting up librrd4 (1.3.1-4ubuntu1) ...

Setting up ntop (3:3.3-11ubuntu1) ...
Adding system user: ntop.
Warning: The home dir /var/lib/ntop you specified already exists.
Adding system user `ntop' (UID 113) ...
Adding new group `ntop' (GID 125) ...
Adding new user `ntop' (UID 113) with group `ntop' ...
The home directory `/var/lib/ntop' already exists. Not copying from `/etc/skel'.
adduser: Warning: The home directory `/var/lib/ntop' does not belong to the user you are currently creating.
Starting network top daemon: Mon Jul 6 11:54:01 2009 NOTE: Interface merge enabled by default
Mon Jul 6 11:54:01 2009 Initializing gdbm databases
ntop

Processing triggers for libc6 ...
ldconfig deferred processing now taking place
  • Ketikan perintah dibawah ini,kemudian lakukan pngesetan password
root@heri-desktop:~# /usr/sbin/ntop -A
Mon Jul 6 11:54:40 2009 NOTE: Interface merge enabled by default
Mon Jul 6 11:54:40 2009 Initializing gdbm databases
ntop startup - waiting for user response!
Please enter the password for the admin user: **********
Please enter the password again: **********
Mon Jul 6 11:54:47 2009 Admin user password has been set
  • Restart service pada ntop
root@heri-desktop:~# /etc/init.d/ntop restart
Stopping network top daemon: No ntop found running; none killed.
ntop
Starting network top daemon: Mon Jul 6 11:55:07 2009 NOTE: Interface merge enabled by default
Mon Jul 6 11:55:07 2009 Initializing gdbm databases
ntop
  • periksa apakah aplikasi ntop sudah berjalan, secaradefault ntop menggunakan port 3000
root@heri-desktop:~# netstat -tulpn | grep :3000
tcp 0 0 0.0.0.0:3000 0.0.0.0:* LISTEN 4054/ntop


  • untuk memonitoringnya buka browser dan masukan url

http://localhost:3000 atau http://ipcomputer:3000

sample local network traffic


network load statistic

Kamis, 11 Juni 2009

Repository Ubuntu 9.04

Bagi yang sudah melakukan Upgrade ke Ubuntu 9.04 Jaunty Jackalope ini ada list Repository Ubuntu 9.04 untuk mengupdate package-package terbaru.

Untuk mengganti atau membuat source list di Ubuntu tinggal ketikkan sudo gedit /etc/apt/sources.list

dan pilih server terdekat dengan koneksi anda.

kambing.ui.edu (UI, Telkom, Indosat, OpenIXP, INHERENT)

# deb http://kambing.ui.edu/ubuntu jaunty main restricted universe multiverse
# deb http://kambing.ui.edu/ubuntu jaunty-updates main restricted universe multiverse
# deb http://kambing.ui.edu/ubuntu jaunty-security main restricted universe multiverse
# deb http://kambing.ui.edu/ubuntu jaunty-backports main restricted universe multiverse
# deb http://kambing.ui.edu/ubuntu jaunty-proposed main restricted universe multiverse

www.foss-id.web.id (Telkom)

# deb http://dl2.foss-id.web.id/ubuntu jaunty main restricted universe multiverse
# deb http://dl2.foss-id.web.id/ubuntu jaunty-updates main restricted universe multiverse
# deb http://dl2.foss-id.web.id/ubuntu jaunty-security main restricted universe multiverse
# deb http://dl2.foss-id.web.id/ubuntu jaunty-backports main restricted universe multiverse
# deb http://dl2.foss-id.web.id/ubuntu jaunty-proposed main restricted universe multiverse

mirror.cbn.net.id (OpenIXP)

1. deb http://ubuntu.cbn.net.id/Ubuntu jaunty main restricted universe multiverse
2. deb http://ubuntu.cbn.net.id/Ubuntu jaunty-updates main restricted universe multiverse
3. deb http://ubuntu.cbn.net.id/Ubuntu jaunty-security main restricted universe multiverse
4. deb http://ubuntu.cbn.net.id/Ubuntu jaunty-backports main restricted universe multiverse
5. deb http://ubuntu.cbn.net.id/Ubuntu jaunty-proposed main restricted universe multiverse

ftp.itb.ac.id (ITB, INHERENT)

# deb ftp://ftp.itb.ac.id/pub/ubuntu jaunty main restricted universe multiverse
# deb ftp://ftp.itb.ac.id/pub/ubuntu jaunty-updates main restricted universe multiverse
# deb ftp://ftp.itb.ac.id/pub/ubuntu jaunty-security main restricted universe multiverse
# deb ftp://ftp.itb.ac.id/pub/ubuntu jaunty-backports main restricted universe multiverse
# deb ftp://ftp.itb.ac.id/pub/ubuntu jaunty-proposed main restricted universe multiverse

komo.vlsm.org

1. deb http://komo.vlsm.org/ubuntu jaunty main restricted universe multiverse
2. deb http://komo.vlsm.org/ubuntu jaunty-updates main restricted universe multiverse
3. deb http://komo.vlsm.org/ubuntu jaunty-security main restricted universe multiverse
4. deb http://komo.vlsm.org/ubuntu jaunty-backports main restricted universe multiverse
5. deb http://komo.vlsm.org/ubuntu jaunty-proposed main restricted universe multiverse

Jumat, 05 Juni 2009

Chatting Facebook Via Pidgin, mau ?

Pidgin adalah aplikasi chat yg sangat flexible yg berjalan di berbagai sistem operasi baik linux atau windows
Fitur yang menarik dari pidgin ini adalah kemampuannya menangani multi account. artinya dia bukan hanya bisa menangani chatting via YM tapi juga melalui jaringan MSN, Google Talk, ICQ, AIM, IRC, Gadu-gadu, MySpace Chat,dll. fitur ini tentunya tidak dimiliki oleh Yahoo messenger. namun ada satu account yang saya rasa cukup penting bagi saya karena cukup sering menggunakannya namun tidak tersedia di pidgin yaitu Facebook chat. layanan chatting dari facebook ini memang secara resmi hanya tersedia di websitenya yaitu ketika kita login ke situs facebook dan fasilitas ini dapat ditemukan di bagian bawah halaman facebook. saya sempat terpikir wah kalau di pidgin bisa buka chatting facebook asik kali ya?
ternyata sekarang dah bisa wah senangnya .

bagi yang mau coba saya akan tulis sedikit caranya.

>> pertama bagi yg belum punya aplikasi pidgin dapat di unduh di sini http://www.pidgin.im/download/ pilih sesuai sistem operasi yg dipakai saya sudah coba baik itu di linux dan windows.

>> kedua tambahkan plugin untuk facebook nya.
untuk linux base debian ,ubuntu http://pidgin-facebookchat.googlecode.com/files/pidgin-facebookchat-1.50.deb
untuk windows http://pidgin-facebookchat.googlecode.com/files/pidgin-facebookchat-1.50.exe
untuk distro linux yg lainnya http://pidgin-facebookchat.googlecode.com/files/pidgin-facebookchat-1.50.tar.bz2

>> apabila semua terlah terinstal tinggal jalan kan saja aplikasinya dan tambahkan account facebooknya ,selamat mencoba


Rabu, 27 Mei 2009

BurnCD dan DVD dengan shell script

Dilinux saya sering memburn cd atau dvd dengan aplikasi sperti k3b atau nerolinux ,tp ada cara lain loh yang bisa dilakukan dengan menggunakan shell script. Disini saya menggunakan dvdrw sebagai medianya.

Script ini saya buat menjadi 2 file ,pertama burncd.sh (untuk memburning cd) dan burnDVD.sh ( untuk memburning dvd), selamat mencoba (gunakan editor vi,nano atau pico untuk membuat script tersebut )


[root@heri sbin]# vi burncd.sh
#!/bin/sh

SOURCE=$1

if [ -n `cdrecord -dev=ATA -scanbus | grep "DVDRW SHM-165P6S" | awk '{ print $1 }'` ]; then
DEVICE=`cdrecord -silent -dev=ATA -scanbus | grep "DVDRW SHM-165P6S" | awk '{ print $1 }'`
echo "burning with device LiteOn DVDRW SHM-165P6S"
/usr/bin/cdrecord -v -eject driveropts=burnfree speed=24 dev=ATA:$DEVICE $1
else
echo "Liteon DVDRW SHM-165P6S not found, cannot continue burning cd"
fi


[root@heri sbin]#vi burnDVD.sh
#!/bin/sh

SOURCE=$1

if [ -n `cdrecord -dev=ATA -scanbus | grep "DVDRW SHM-165P6S" | awk '{ print $1 }'` ]; then
DEVICE=`cdrecord -silent -dev=ATA -scanbus | grep "DVDRW SHM-165P6S" | awk '{ print $1 }'`
echo "burning with device LiteOn DVDRW SHM-165P6S"
/usr/bin/cdrecord -v -sao -eject driveropts=burnfree speed=24 dev=ATA:$DEVICE $1
else
echo "Liteon DVDRW SHM-165P6S not found, cannot continue burning cd"
fi